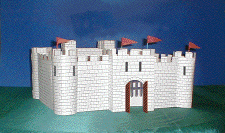
Putting Your Castle Together
Instructions for Build a Medieval Castle
 Castles
were built in a large variety of shapes--rectangular, hexagonal,
or round. One was built in the shape of a shield. The best site
for a castle was a place that could be easily defended--on a
piece of solid rock that stood above the surrounding countryside
or on the edge of a cliff above the water. The shape of the
castle and the locations of the towers were often irregular, to
fit the building site. These instructions are for a castle with
four towers, arranged in a rectangle, with a front gate. It is
perfectly accurate, however, to build your own castle in a
different shape or with more towers, etc.. See Extras below for ideas on changes and additions to the basic
castle.
Castles
were built in a large variety of shapes--rectangular, hexagonal,
or round. One was built in the shape of a shield. The best site
for a castle was a place that could be easily defended--on a
piece of solid rock that stood above the surrounding countryside
or on the edge of a cliff above the water. The shape of the
castle and the locations of the towers were often irregular, to
fit the building site. These instructions are for a castle with
four towers, arranged in a rectangle, with a front gate. It is
perfectly accurate, however, to build your own castle in a
different shape or with more towers, etc.. See Extras below for ideas on changes and additions to the basic
castle.
Materials and Tools:
Scissors, tape or glue, markers or crayons, paper, a PC
with printer and Build a Medieval Castle free software.
Helpful: a large piece of paper or cardboard or several
sheets of paper fastened together to go underneath the castle;
paper clips to hold parts together during construction;
toothpicks and colored paper to make pennants to put on the
towers; index cards.
General Rules:
CUT on the heavy lines. FOLD on the dashed
lines. Where there is a blank space inside the cut lines, instead
of stone pattern, it means that another piece is meant to be
glued over it (this does not apply to the shed). Tabs that are
meant to be folded are separated from the rest of the piece by a
dashed line. Fold all tabs away from you.
Hints: The walls and towers are different heights. Make
sure the bottom edges match up. Paper clips, especially
the plastic ones, will hold glued pieces together while they dry.
They will also hold pieces in the proper alignment while you tape
them.
Print out the pieces:
For the basic castle you will need to print out these pieces:
| Tower | 4 | ||
| Front Wall | 2 | ||
| Side Wall | 2 | ||
| Gate 1 | 1 | ||
| Gate 2 | 1 | ||
| Back Wall 1 | 1 | ||
| Back Wall 2 | 1 | ||
| Keep 1 | 1 | ||
| Keep 2 | 1 | ||
| Keep Top | 4 | ||
| Shed | 1 | ||
| Shed Roof | 1 |
There are two Keep Tops on a
page, so you only need to print two copies for four tops.
If you make a mistake,
or change your mind, just print out new copies of those pieces.
Color
the pieces first. It is easier to color the walls with paint or markers since there are large areas to color. It is also authentic to leave the walls white, since castles were sometimes white-washed after they were built, to make them seem even more impressive. The walls and towers could be any stone color. There were small holes left in the wall from building (timbers were inserted to hold up the scaffolding as the wall went up); ivy and small plants, like the ones you see in rock gardens might grow in these holes.
Cut Out
the pieces on the heavy lines. Note that the shed and the Keep Tops have extra cut lines that are not outlines. Cut the doors on the top and one side so that they open and shut. The gatehouse has doors which are cut in the middle, and they hinge on each side. There are doors in the towers, the gate house, the keep and the back (postern) door in the castle wall. You may also want to cut the doors in the shed. You can cut holes for the windows if you wish--use small scissors.
Assembly:
Towers: Start with the four towers, rolling the pieces and gluing or taping them to cover the blank area with no stone pattern. The door and window in each tower should face into the castle courtyard, and the narrow slits should face out. Put your four towers into the shape of a rectangle, and decide which is the front of your castle. The front and back are longer than the sides.
Walls: The 2 Side Walls have small, equal blank areas on each end. Fold these away from you as you look at the printed side. Tape or glue each of these side walls to a tower, so that each wall has one tower on each end of it. You should have 2 separate pieces of a wall with two towers flanking it:
O---O O---O
Take the piece of back wall (Back Wall 2) with the small door in it. This is the left side piece of the back wall. The other piece of back wall (Back Wall 1) that has a large blank (no stone pattern) piece on it; it is the right side of the back wall. Glue or tape these together so that the blank area is covered up. This makes a stronger wall that would be achieved by cutting off part of that piece of wall. You should have a wall piece that is longer than a single piece of paper, is double thickness for part of it, and has a door in the middle. Cut out the extra thickness of paper for the door. Fold on the dashed lines, away from you as you look at the stone pattern, and fasten the tabs to the towers, so that you now have a single piece, three sides of a rectangle. Make sure that you put the back wall on so that the doors on the towers face into the courtyard.
Gatehouse: Gate 1 and Gate 2--Fold on the dotted lines, away from you as you
look at the stone pattern. The dashed lines are a little hard to
distinguish in the pattern of the stones. After folding the tab,
fasten (tape or glue) the tab on each piece under the edge (the
edge with no tab) of the other piece, making a rectangle. If you
are using tape, it is generally easiest to tape the inside
(unprinted) parts first, and then tape the pieces together on the
outside. The front has a large door, big enough for a mounted
knight to ride through easily, and arrow slits to shoot at
approaching enemies.
Take a short piece of
wall (Front Wall) and fold both tabs back, away from you as you
look at the printed side. Attach one tab to a tower, making sure
that the side with the stone pattern is on the outside. Attach
the other tab to the side of the gatehouse. The walls should
attach to the gatehouse more than halfway back; that is, the
gatehouse should stick out from the wall more than halfway.
Attach the other piece of wall to the other tower and to the
other side of the gatehouse.
Keep: Keep
1 and Keep 2 go together the same way you did the gatehouse. Fold
on the dotted lines, away from you as you look at the stone
pattern. After folding the tab, fasten (tape or glue) the tab on
each piece to the edge (the edge with no tab) of the other piece,
making a rectangle. If you are using tape, it is generally
easiest to tape the inside (unprinted) parts first, and then tape
the pieces together on the outside. The front of the keep has the
large door in the middle of the wall. The slightly smaller door
leads to a kitchen. The Great Hall, where banquets were held, and
the lord held court, is on the second floor. Note that there are
no windows on the first floor, to make the keep easier to defend
if necessary. The chapel would have been on the upper floor of
the keep, or on the upper floor of one of the towers.
To make the tops of the
keep (Keep Top, 4 pieces) fold on the dashed lines and tape or
glue to form a square. If you haven’t already cut them, cut
the two lines from the bottom that go almost halfway up the top
of the keep. Slide one of these pieces onto the top of the front
left edge corner of the keep, with the front side of the keep and
the left side of the keep each going into one the slits. Put the
other three pieces on the remaining corners.
Shed: (Shed and Shed Roof) After cutting the shed on the heavy line, also cut the two heavy lines that continue into the pattern, leaving a triangular piece on the side. Fold the tabs away from you, and fold on the dashed lines. Cut the doorways. Tape or glue the tabs onto the side pieces. Fold the roof on the dashed lines. Tape or glue the tabs on the triangular side pieces onto the roof. The shed would have been made out of wood, or wattle-and-daub; not stone. It goes inside the castle courtyard, and is a utility building. If attackers got past the walls, the castle defenders would barricade themselves in the keep, and try to continue to defend themselves until help came. The sheds would not be defended. You might want two sheds. Sheds might be used to keep horses, as temporary sleeping quarters for servants who were visiting with their masters, as a place for a blacksmith, carpentry shop or other labor, or as a kitchen. The small side door of the keep generally went to the kitchen.
Extras:
You can easily add more
towers and more plain wall sections to make your castle larger,
or a different shape.
Put colored pieces of
paper, perhaps in a long triangle shape with the short end
fastened to the toothpick, to make banners. Decorate the banners.
Put the banners on top of one or more towers, fasten with tape.
Standards, showing the heraldic symbols of the lord of the
castle, would be displayed also.
Use an index card to
make a drawbridge to go on the outside of the gatehouse.
Take another index card,
and cut it in half lengthwise. Fold each piece lengthwise as
sharply as you can. Fasten one piece, vertically, on one side of
the outer gatehouse door. Fasten one half as flat as you can,
leaving the other half free. Put an index card so that it slides
up and down in the slot you have created, and fasten the other
piece of index card to hold the other side. Draw vertical and
horizontal bars on the index card to make a portcullis.
Put a well, an herb
garden, a dove-cote, a fish pond, a bee hive, a fruit tree, or a
rabbit hutch in the castle courtyard. All of these things gave a
little variety to the food for the people in the castle.
Decide where the castle
chapel is located--either on the top floor of the keep, or in one
of the towers. Cut out the appropriate window, and put color
cellophane in it for the stained glass of a chapel.
How Did People Live in your Castle?
Decide what the
people in your castle need, where they get it--from the peasants
in the surrounding countryside, from infrequent fairs or sent
from a larger town, from the castle itself, or from the forests
around the castle. Where do they store it? How do they make sure
it is safe, both from the weather or animals, and from people?
Much of the food would be stored in the bottom level of the
towers, which had the advantage that it could be used by warriors
defending that tower.
Where do the lord and
lady have their private rooms? Where are the rooms for guests?
For the guests’ servants? Where is the dungeon? (Usually
under the keep).
The postern gate, in the
back wall of the castle, was used by tradesmen and servants
during peace time. The postern gate was generally made so that
only one person, unmounted, could go through at one time. It was
firmly barricaded during times of conflict--unless, of course,
the castle wanted to send a messenger out. If possible, it would
be built on a steep cliff, accessible only by a path that could
be traveled only on foot. (In that case, I expect that another
gate was also built for tradesmen.)
Copyright 2000-2007 Owl and Mouse Educational Software